aG Balance 1500 Training Manual
Page 1 - aG Balance 1500 Series Training Manual
aG Balance
Training Manual
1500 Series - March 2019
Introduction
Integrated with 3Trak-powered aboutGOLF technology, aG Balance provides world-class swing balance data for analysis and instruction.
With dual force plate technology, aG Balance provides comprehensive data for evaluating player swing profiles, including the distribution of weight left to right and front to back for each foot.
aG Balance data is presented in easy to understand visual graphics, as well as detailed data to support scientific analysis.
All swing / balance data is time stamped and synchronized to the swing motion and instant of impact. Integrate with aG Flix to provide time synchronized Swing Video for side-by-side analysis with aG Balance.
aG Balance Screen: Feet set to Pressure Map
Start aG Balance
To access the aG Balance screen:
- From the Main menu select Practice.
- If Range360 is installed:
- Choose Range to go to the Practice Range.
- Choose Range 360 to go the Range 360.
- At the Golfers screen, click Range.
- Take a shot with the balance plate attached to your Simulator.
- Choose the aG Balance tab on the Post Shot menu.
- Or select Navigate - Post Shot - aG Balance.
Choose aG Balance at the Range Post Shot screen
|
How to Use aG Balance
Place a golf ball in the tee area and address the ball as you would to hit a shot.
Once your feet are planted to hit the shot, rock your weight from heel to toe on both feet until the aG Balance searching for footprint message changes to aG Balance footprint found.
If you hit a shot when the message aG Balance searching for footprint is displayed, weight data will be captured, but with no clear definition of foot placement.
Balance data with
no footprint found
How to Use aG Balance
When your feet are planted and you rock your weight from heel to toe on both feet until the aG Balance searching for footprint message changes to aG Balance footprint found, you will see individual foot tracking on the post shot screen.
Once the technology has identified your footprint, do not move your feet to reset. If you need to reposition, step off the stance area and wait for the aG Balance searching for footprint message. Then reset your footprint.
Balance Data with footprint found
aG Balance Menu
To view aG Balance options, click the menu button at the lower left of the screen.
The following options are available from the aG Balance menu:
- Hide/Show Postshot - Click to hide/display the post shot buttons and data
- Window Layout - Choose from 9 different window display views
- CoP Graph - Choose what to display on the Center of Pressure graph
- Force Chart - Choose what to display on the Force Chart
- Select Shot - Select the aG Balance shot data you wish to display on the screen
- Save Shot - Save your aG Balance shot
- Swing Markers - Display or hide swing markers on the playback scrollbar
aG Balance Menu
Hide/Show Postshot
Click Hide/Show Postshot to remove or display the post shot buttons and data.
Hide Post Shot is ON
Window Layout
Click the Window Layout button to choose from 9 different window views including:
- CoP graph (main window left), shot video (upper right), swing scope meter (lower right)
- CoP graph (upper left), force chart (lower left), shot video (upper right), swing scope meter (lower right)
- CoP graph (main window left), shot video (upper right) and force chart (lower right)
- Force chart (main window left), shot video (upper right) and Cop graph (lower right)
- Shot video (main window left), CoP graph (upper right) and force chart (lower right)
- CoP graph (main window left), shot video (upper right) and shot video 2 (lower right)
- CoP graph (upper left), force chart (lower left), shot video (upper right), and shot video 2 (lower right)
- CoP graph (window left) and shot video (window right)
- CoP graph (main window)
aG Balance Window Layout Options
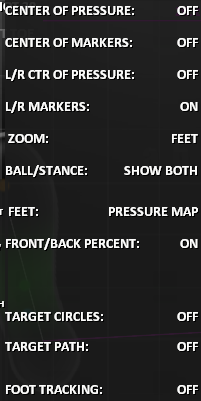 CoP Graph
The player’s center of pressure is displayed as a line on the CoP graph that traces the changes in weight distribution as the player swings. Select various options to display including:
- center of pressure - On/Off: The CoP line indicates the path throughout the swing.
- If no swing markers are selected, the CoP path will display as a yellow line on the graph.
- center markers - On/Off: The moving blue circle indicates the center of pressure, while the stationary orange circle indicates the point of impact.
- L/R ctr of pressure - On/Off: The red line indicates the CoP for the left foot while the blue line indicates the CoP for the right foot. The orange line indicates the point of impact for both feet.
- L/R markers - On/Off: The moving blue circle indicates the CoP for each foot, while the stationary orange circle indicates the point of impact for each foot.
- zoom - Allows you to zoom/increase display of the CoP graph data, or to display ball/stance data to scale.
- ball/stance - Options are: Show Both, Ball, or Off.
- feet - Options are: Outline, Pressure, Off.
- front/back percent - On/Off: Toggles the display of front/back percentages of force for each foot.
- target circles - On/Off: Ideal CoP location for each foot throughout the swing. Click to move.
- target path - On/Off: ideal path for the CoP line throughout the swing. Click to move.
- foot tracking - On/Off: Choose to display or hide footprints.
Horizontal Power Bar
At the bottom of the CoP graph, use the horizontal power bar to view the weight applied to the right foot and left foot throughout the swing.
aG Balance Menu
Force Chart
The force chart illustrates the downward forces generated by the player during the shot vs time. View the weight transfer for the right foot, left foot, and center of pressure throughout the swing. The point of impact is illustrated by the vertical orange line. To display the force chart in the main aG Balance window, click the menu button at the lower left of the screen then choose Window Layout. Select various options to display including:
- total force - On/Off: Toggles display of the total force line (yellow/orange) on the force chart along with the ‘Center’ numeric value at the upper right of the force chart window.
- L/R forces - On/Off: Toggles display of the right (blue) and left (red) force lines in the force chart along with the ‘Right’ and ‘Left’ numeric values at the upper right of the force chart window.
- numeric display - On/Off: Toggles the numeric display for ‘Center’, ‘Right’, and ‘Left’ at the upper right.
- numbers - Choose from ‘weight’ or ‘percent’. Specifies the type of numeric data to show at the upper right and on the vertical axis of the force chart. Weight is the downward force in pounds or newtons on the force plate system. Percent is the percentage of the player’s weight applied to the force plates.
- foot tracking - On/Off - Toggles the tracking of footprints.
Force Chart set to
Main Window
Select Shot
Select a previously saved aG Balance shot to view.
Save Shot
Click to select and save the displayed shot. A Balance file will be created. If there are Flix cameras connected, a Flix video file will also be created.
The saved files are written into the Friendly Software/World Tours Golf/Members/<Player Name>/<Club> folder and are named similar to the shot data file (eg shot1.saf, shot1.bal, shot1_cam1.mp4)
aG Balance Menu
Swing Markers
Swing markers are used to designate points of interest of your swing. After selecting the swing marker, a colored marker is placed on the playback scrollbar under the white pointer. To move a swing marker on the scrollbar to your desired location, click and drag it. The swing marker will be indicated on the CoP graph and by a vertical colored line on the force chart.
Swing Markers – Click to display the Swing Marker menu. The following options are available:
- Swing Markers On/Off
- Address
- Mid Backswing
- Top of Swing
- Mid Downswing
- Impact
- Follow Through
- Finish
Swing Markers
How to Use Swing Markers
- Drag the white slider indicator to an unmarked area on the playback scrollbar.
- Click the menu button at the lower left
- Choose Swing Markers
- Be sure Swing Markers are On
- Select one or more swing markers
- The swing marker will display under the white slider indicator on the playback scrollbar
- To move the swing marker, click on it and drag it to its desired location
- The corresponding markers on the CoP graph and the corresponding vertical lines on the force chart will be displayed based on the location of the swing marker on the playback scrollbar.
- Note: The impact marker cannot be moved as it’s location is determined by the Launch Monitor.
- Swing markers can be set for all aG Balance shots.
- To delete a swing marker, drag the marker off the playback scrollbar - either all the way to the right or all the way to the left - and release the mouse button. The swing marker will be removed from the scrollbar.
- Swing Markers are stored with a shot’s Balance data and can be recalled later.
- To delete swing markers from the aG Balance screen, turn off swing markers at the Swing Marker menu.
Playback Scrollbar with Swing Markers On
aG Balance Screen
The aG Balance screen provides the following additional options:
Live View
- Click on Live View at the lower left of the screen to activate and deactivate the live streaming of balance data:
- Live View can be used as a training aid to develop the proper path of weight distribution.
- Select the target path and target circles options to indicate the ideal path.
- For best results, when live view is activated, turn off the foot tracking option.
Playback Controls
Allows manipulation of the playback of a shot in all windows. Playback buttons include:
- > / || - Play / Pause the video
- square – Stop the video
- |< - Scroll the video back - or use the left arrow key to scroll back
- >| - Scroll the video forward - or use the right arrow key to scroll forward
aG Balance Screen Options - Live View and Playback Controls
Target Path and Target Circles
- From the CoP Graph menu, turn on the target path (green) and target circles (white) to compare to the center of pressure movement during the swing.
- The target path and target circles may also be moved based on your preference for the ideal path.
- You can also simultaneously view the golf swing video for your shot if aG Flix is enabled.
Enable aG Flix
- Click anywhere on the video window area to display all the aG Flix videos associated to your shot.
- Select any of the available aG Flix videos to be played in sync with the aG Balance data.
- You can also choose the drawing tools option to draw graphics on you aG Flix windows from the aG Balance screen.