aG Control 1500 Training Manual
Page 1 - aG Control 1500 Series Training Manual
aG Control
Training Manual
1500 Series - Rev 2.90: March 2019
Introduction
Welcome to aG Control, your must-have tool for multi-simulator management. With aG Control you can monitor and manage players, rounds and simulators from a convenient, easy to use interface. aG Control can be used from any PC on your network. The major features of aG Control include:
- Create and manage players
- Create and manage rounds
- Monitor rounds in progress
- View simulator screens
- Send messages to simulators
- Get simulator information
- Analyze usage
- View and print scorecards
Setup
You will need the following to set up aG Control:
- An aboutGOLF online user account with username and password.
- aboutGOLF simulator software version 900 or later, licensed for aG Control.
- A stand-alone aG Server, configured with your network settings.
NOTE: A wired network or a wireless connection with “Excellent” signal strength for each simulator is recommended for optimal aG Control performance.
Step 1: Install the simulator software following the instructions provided with your version. NOTE: Your simulator software license must include aG Control.
Step 2: Set the ServerInit.txt file to point to your SDK server:
- Go to C:\Program Files\Friendly Software\World Tours Golf\PGA TOUR Simulator
- Open the Serverinit.txt file
- Modify the fourth line in the file to read: “http://<ip address>” where <ip address> is replaced with the IP address of your SDK server.
- You can find the <ip address> on the setup card that came with your stand-alone aG Server.
Step 3: Add your simulator to aG Control.
To add a simulator to your aG Control account, make sure the simulator computer is connected to the network and start the simulator software.
The simulator will register itself with the SDK server. At the confirmation screen, click OK.
Go to the Utilities screen.
Click Yes to register the simulator to aG Control.
Give the simulator a unique name that allows you to easily identify it. Click OK.
Click OK to complete adding the simulator to aG Control.
You are now ready to start using aG Control to manage the simulator.
Repeat this process for all simulators you wish to register to aG Control.
|
Log Into aG Control
- Type the IP address of your SDK server into the address bar of your web browser.
- For example: Enter http://<ip address>, where <ip address> is replaced with the IP address of your SDK server.
- The aG Control login page will display.
- Enter your username and password to log in.
aG Control Login Screen
Using aG Control
Top Menu
The top menu allows you to navigate between the aG Control user interface screens. After logging in, the Simulators Screen is displayed.
Elements of the top menu include:
- Server Name
- Date/Time
- Logout Button
- Navigation Buttons. Use the navigation buttons to access the following screens:
- Simulators
- The Simulators screen is for monitoring and controlling your simulators. This screen features some extra buttons in the top menu and a display area for each of your sim cards.
- Member Manager
- The Member Manager screen allows you to manage online members. You can create new members, edit existing members, manage user groups, and assign or remove members to/from your server.
- Analysis
- The Analysis screen is for viewing simulator usage statistics. You will see two main sections here, one titled “SIMULATORS” and one titled “SESSION INFO.”
- Options
- The Options screen is where you can set default values and settings. After making changes, use the “SAVE” button to save all changes.
Using aG Control
Simulators Screen
The Simulators screen allows you to monitor and control your simulators. This screen displays each of the simulators you have registered to your server (shown as sim cards on the screen), along with options for organizing your sim cards.
To organize your sim cards, choose from the following options along the top:
- Collapse Sim Cards - Toggle to expand or collapse the sim card display.
- My Sim Groups - Select a sim group. All sim cards associated to that group will display.
- Sim Group Manager - Create or delete a sim group.
Collapse Sim Cards
Clicking this button will hide some of the information for each sim card for a more compact view (see below). This allows more sim cards to be displayed in a smaller area.
Note: When the sim cards are collapsed, the button name will change to expand sim cards. Clicking expand sim cards will restore the sim cards to their original display.
Using aG Control
Sim Groups
Sim groups allow you to group your sims together to show or hide certain sims. For example: If you have a first and second floor, you can group your sims together to display only one floor at a time.
To create a new sim group:
- Click on the sim group manager button at the top left of the screen
- Or right click on any sim card and choose Sim Group Manager.
- Click on create sim group.
- Enter a name for your sim group and choose create.
Using aG Control
Sim Groups
To add a sim card to an existing Sim Group:
- Right click on the sim card you wish to add to a sim group.
- Choose Sim Group Manager.
- Select the sim group in the list you wish to add the sim card to.
- Click on set sim groups.
Using aG Control
Sim Groups
To select a sim group:
- At the top left of the screen, click My Sim Groups and select the group you wish to display.
- Only sim cards associated to the selected sim group will display on the Simulators screen.
- Note: All sim cards will be displayed by default.
Sim Group Manager
To manage your sim groups, click the sim group manager button at the top left.
You can create or delete sim groups at the Sim Group Manager menu.
Using aG Control
Sim Cards
Each sim card represents one of your simulators. On the sim card, you will see information describing the current state of the simulator.
Right click on any sim card to display a menu to complete the following tasks:
- Move To Top - Move selected sim card to the top of list.
- Sim Group Manager - Open the Sim Group Manager menu.
- Rename Sim - Rename the selected simulator.
- Delete Sim - Delete the selected simulator.
Using aG Control
Sim Card
- At the top of the sim card, the name of the simulator along with the simulator status displays.
- Below the sim name and status are two tabs: View Stats and View Screen.
- The View Stats tab displays the course that is currently being played in that simulator as well as each player and their score.
- The View Screen tab shows you a screenshot of the simulator in approximate real-time.
- Note: It may take a few seconds for you to start receiving screenshots from the simulator after selecting this tab.
- Next to the View Screen tab, the holes completed/holes selected values display when a round is in progress.
- Near the bottom of the Sim Card, a series of times relating to the current round display.
- Start - The time that the round was started.
- Elapsed - The time that has passed since the round was started.
- Est. End - The estimated time that the round will end, based on the group’s progression speed so far. The estimated end time will start being populated once the first hole is completed.
- If you have a timer running on the simulator, you will see the status of the timer to the right of the Start time. The timer status will show you how much time is left on the timer, and if the timer is paused or expired.
- At the bottom left of the sim card you may see a button labeled Support/Help, Sim Stuck or Multiple Requests.
- Support/Help displays when the customer has clicked the Call Attendant button in the simulator.
- Sim Stuck displays when the simulator is currently unable to be controlled via the aG Control interface because it is stuck in some way. This usually happens when a message box is up on the screen or user interaction is required. This status will usually clear itself out quickly, but if it persists, attention at the simulator may be needed.
- Multiple Requests display when there is both a Support/Help and Sim Stuck request pending. Clicking this button will bring up the large Sim Panel and allow you to respond to each request separately.
- To clear and acknowledge the pending request, simply click on the button displayed.
- Note: Normally, no button will display in this area - which means there are no service requests pending.
Using aG Control
Sim Card
- At the bottom right of the sim card is the Open Sim button. Clicking this button, or double-clicking on the sim card, will open the large sim panel. The large sim panel, or sim menu, gives more detail on the current state of your simulator. It also allows you to control your simulator by pushing rounds to your simulator, adding simulator time, ending rounds or shutting down your simulators.
Large Sim Panel
The large sim panel is for more detailed monitoring and controlling of your simulators. It is accessed by double clicking on the sim card or by choosing the Open Sim button at the bottom right on the sim card.
- The sim name displays at the top left.
- The sim status displays at the top right.
- Below the sim name and status there are four tabs including:
- View Details
- View Screen
- View Scorecard
- Create/Resume Round
- Note: You may also see one or more buttons to the right of the tabs, indicating that there is a service request pending on that simulator.
Using aG Control
Large Sim Panel
After selecting the Open Sim button or double clicking on the sim card, the Large Sim Panel menu will display.
View Details Menu
Using aG Control
View Details Menu
The View Details menu displays information similar to the sim cards and includes additional options that let you control your simulator by sending commands from this menu.
Commands are only available when the simulator software is running. The available commands are:
- end round - Ends the current round in progress and returns the simulator to the main menu.
- exit sim - Exits the simulator software and returns the computer to the desktop.
- shutdown sim - Turns the simulator computer off.
- restart sim - Restarts the simulator computer.
- send message - Displays a pop-up prompting to enter a message that will be displayed in the simulator. The amount of time the message will be displayed can also be selected.
- add time - Displays a pop-up prompting to select the amount of time to be added to the simulator’s timer. If the timer is not currently running, the timer will be turned on and started with the amount of time you choose.
- pause/unpause timer - If the timer is running on the simulator, this option will toggle the timer to either pause or unpause. Please note that it will take a few seconds for this setting to take effect.
- clear - This will clear the time and turn off the timer, allowing the players to continue playing.
- clear/lock sim - This will clear any remaining time and lock out the simulator - the same as if the timer had expired.
There are two more options below the command buttons: Simulator Info Screen
Simulator Info - Clicking the Simulator Info button will show detailed information about the simulator hardware and software.
- Clear Queue - The Clear Queue button can be used to quickly clear a command that has been sent to the simulator, but not yet executed by the sim.
View Screen Menu
Click the View Screen tab to view screenshots of what is currently displayed on the screen for the selected simulator (in approximate real-time). Please note that it will take a few seconds after entering this menu for the screenshots to be sent from the simulator to update this screen.
View Scorecard Menu
Click the View Scorecard tab to view the scorecard of the current round or past rounds played on the selected simulator.
- To select which scorecard to view, use the dropdown menu in the top-left corner. Note: Scorecards only display in the list if at least one hole has been completed for the round, including the current round.
- To view or print a larger version of the scorecard, click the button view full size (printable).
- Click the text format checkbox to view a text version of the scorecard, which may be more suitable for printing.
Using aG Control
View Scorecard
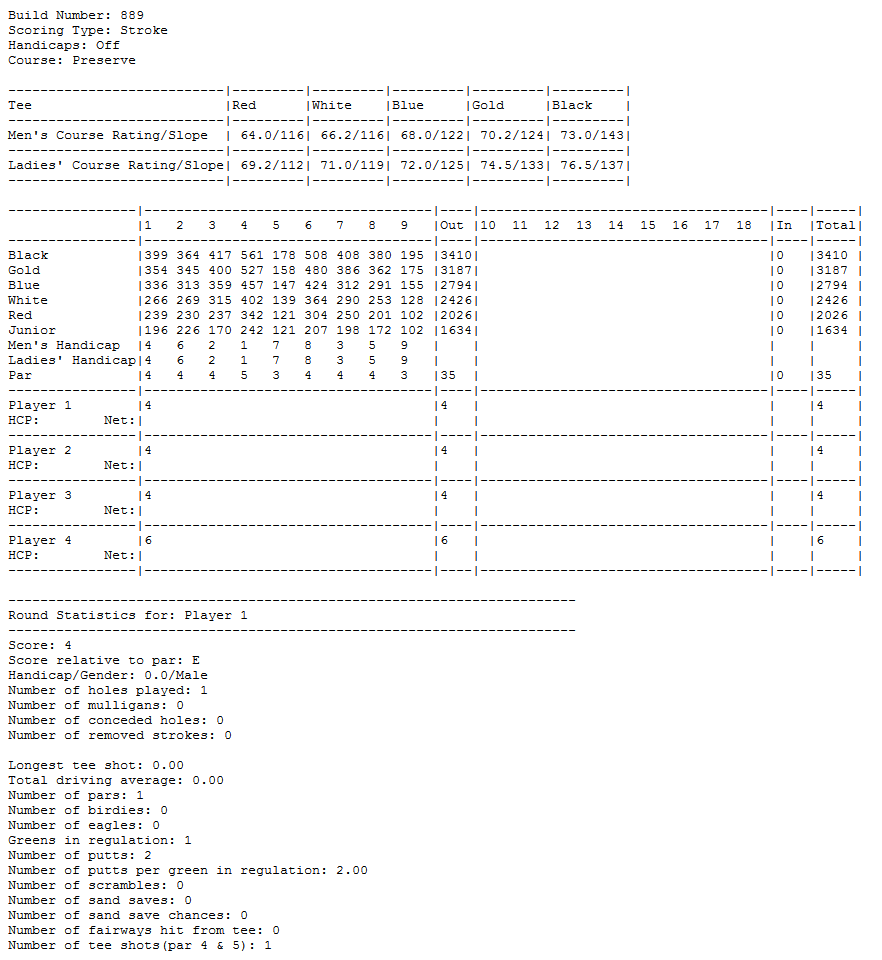 Text Scorecard
Create/Resume Round
- The Create/Resume Round menu allows you to create new rounds, resume saved rounds, and start queued rounds.
- The members, member options and round options you select at this menu will be set in the simulator after transmitting the round.
- You have the option to transmit range only rounds, range before game rounds, and game only rounds at this menu.
Using aG Control
Create/Resume Round Options
- SHOW - If you want to find a member that is not yet assigned to your server, you can change the SHOW dropdown list from Our Members to All Members. The All Members list will take a few minutes to populate (it is a very long list).
- Member List - By default, this is populated with only the members that are assigned to your server. As more players play at your golf center, this list will grow.
- Username - You can narrow the member list by entering a partial name in the username box below the member list. As you begin typing a username, the list will be filtered to only show potentially matching usernames.
- GROUP - You can also narrow the list of members assigned to your server by using the GROUP dropdown list menu. Note: To assign members to groups, go to the Member Manager screen.
- Add/Delete Members from Round (Today’s Group )
- To add members to the round:
- Double-click on a single user in the member list. This will select the member for round play and move the member to the round list - or what we call Today’s Group – which is next to the member list.
- Drag the user from the member list to the Today’s Group list.
- Select multiple members to add at one time by holding the CTRL or SHIFT on your keyboard and clicking on multiple members. CTRL will select the members that you click on, while SHIFT will select a range of members. Now drag the selected members to the Today’s Group list.
- Note: A maximum of 8 members can be added to Today’s Group at one time.
- To delete members from a round (in Today’s Group):
- To remove players from a round:
- Double-click on an individual player to remove them from the Today’s Group.
- Highlight one or more players (using CTRL or SHIFT) and either press your keyboard’s DELETE button or use the button labeled remove player(s) below the Today’s Group list.
- Remove all players from the group at once by using the clear group button.
- Quick Players - If you have a member that doesn’t want to create an aG online member account, but instead wants to quickly jump into a game round, you can use the quick player feature.
- Click the button labeled quick player below the Today’s Group list. Either accept the default quick player name that is displayed or enter a new name for the quick player. Note: The newly created quick player will not have any permanent account with aboutGOLF and will not be able to access online features, such as the aG Data website.
Using aG Control
Create/Resume Round Options
- Resume Saved Rounds - To resume a saved round, choose one of the following three options:
- Saved Rounds - This menu is populated with all the rounds that have been started, but not yet finished.
- Queued Rounds - This menu is populated with all rounds that have been saved when choosing the Save to Queue option. These rounds have not yet been started.
- Member Rounds - To enable this option, you must first highlight a single member in the member list. Once highlighted, the menu will be populated with all the rounds that member has participated in, including automatically saved rounds (which are labeled Autosave).
- Once you choose a round from any of the three saved round options, all the settings for that round are populated.
- The members included in the selected round are added to the Today’s Group list and all the game options selected from that round are set.
- If the round has already been started, many of the game and member options cannot be changed, however some options are still editable.
- Login - You have the option to log in any online member before sending the round to the simulator.
- Select a single online member in the Today’s Group list and then click the LOGIN button.
- You will be prompted to enter the member’s password if the Remember Password option is not set.
- Once you set the Remember Password option, you will not be required to enter the member’s password for future logins and the member will automatically be logged in when adding them to Today’s Group.
- If the member is not logged in before sending the round to the simulator, the member will be prompted in the game to either enter their password or continue in offline mode.
- In offline mode, the member’s settings will not be downloaded from the aG Data server, and settings and data will not be uploaded to the aG Data server.
- Member Settings - Select the following options for your member before pushing a round:
- HCP - The handicap value you enter will be used in the round if the Handicaps option is on.
- Tee - Select the tees for your member.
- Gender - Select the gender for your member.
- Game Types - Select the type of game you wish to play. Game Type options are:
- Range ONLY session.
- Round ONLY session.
- Range-before-Round session (both the Range and Round options are selected).
- For Range sessions, you can choose from several different range venues.
- For Range-before-Round sessions, you do not have the option to select a range venue; however you can specify the amount of time to spend at the range before transitioning to the round.
Using aG Control
Create/Resume Round Options
- Game Timer - When enabled, the timer in the simulator will be set to the value you specify here (in minutes).
- Any time already set on the Simulator will be overwritten with the time set here when the round is sent to the game. If no time is set, after transmitting the round, the timer will be turned off -- even if the timer was previously set in the game.
- Note: If a range before round session has been selected, the time selected at the Game Timer option is the total time allowed.
- For Example: If you set the range time to 5 minutes and the game time to 60 minutes, the total time you can spend at both the Range and Game will be 60 minutes – not 65 minutes. If you spend 5 minutes at the Range, then you will only have 55 minutes left to spend in the game.
- Round Options - The following options can be set for a Round:
- Course - After selecting a course, the course holes to select will display.
- Wind Speed
- Pin
- Holes - Select the holes for your round. All available holes will be selected by default.
- Note: Only certain holes may be available for some courses.
- Scoring - Match and Scramble play require at least 2 players.
- Handicaps - If handicaps are on, you have the option to set the following:
- absolute or relative handicaps
- course rating and slope (on/off)
- percent of handicap to apply
- Gimme
- Auto Continue
- Auto Gimme
- Mulligans
- Auto Drop
- Auto Concede
- Go to Tee - If this option is checked, the game will skip the setup screen and go straight to the first tee of the round. If unchecked, the game will stop at the setup screen, where players can change game options at the simulator before continuing to the round (if the round is new and is not being resumed).
- Save to Queue - This option allows you to set up rounds before you are ready to send them. This option makes it easier to coordinate leagues as you can set up your rounds ahead of time before the leagues start. When saving a round to the queue, you will be asked to provide a name so your round can easily be indentified and started at a later time.
- Send to Simulator - Once your members have been selected and all your round options have been set, click this button to send your round to the Simulator.
Member Manager
The Member Manager screen allows you to manage online members. From the Member Manager screen you can create new members, edit existing members, manage user groups, and assign or remove members to and from your server.
Create New Member
To create a new member:
- At the Member Manager screen, click the create member button at the top of the member list.
- A new box titled Create Member will be displayed to the right.
- In the Create Member box, create a new member by completing the following fields:
- Username
- Password (with the option to have it remembered on the server)
- Email Address
- NOTE: Inform your customer to provide a valid email address. If they forget their password, a new password can be emailed to them at this email address – it is not used for any mailing lists.
- Gender
- Handedness
- Handicap
- Preferred tee
- Click on the Game Settings option to select various game settings for your member including:
- Shot Camera
- Grid Setting
- Grid Type
- Swing Profile Settings
- Physics handicap Settings
- The game settings selected here will be set for your member when playing a round.
- Click Submit to save and create your new member or Cancel to cancel the creation of the new member.
- After clicking Submit, you will be prompted to confirm your password before the new member is created.
Member Manager
Create a New Member
Click Game Settings to select additional options for your member. Click Submit to save and create your new member.
Edit Members
To edit an existing member:
- Select the member in the member list and double-click on that member.
- You will be prompted to enter the member’s password, unless remember password has been checked.
- When entering the member’s password, you have the option to remember the password for the future so it is not required for subsequent logins.
- If the user has forgotten their password, you can use the forgot password button and the password will be reset and emailed to the address on file for that member.
- Once you have provided the password, a menu will display titled Edit Member.
- All fields associated to the member can be edited except the name field.
- To save and accept your changes click Submit or choose Cancel to discard your changes.
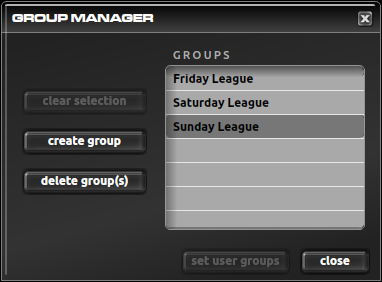 Group Manager
- The group manager is used to create or delete user groups, as well as assign members to groups.
- To access the group manager, click on the group manger button at the bottom of the Member Manager menu.
- To create a new group, click the create group button and provide a name for the group.
- To delete a group, highlight the group or groups that you want to delete and press the delete group(s) button.
- Use the group manager to organize your members for display at the Create/Resume Round menu. Only members associated to the selected group will display in the member list at the Create/Resume Round menu when that group is selected.
- To assign members to a group, select one or more members (using the CTRL or SHIFT buttons on your keyboard).
- Select the group manager button at the bottom of the screen.
- The group manager menu will display.
- Any groups to which all selected members commonly belong will be highlighted by default.
Member Manager
Add Member(s) to Group
- Select the group in the list you wish to add your member(s) to.
- Now choose the set user groups button.
- Your member(s) will be added to that group.
- You can also remove the members selected from all groups by choosing the clear selection button.
Assigning/Removing Members to Your Server
- Our Members - This is the default member list display option. When the our members option is selected, you will see the Our Members title at the top left of the screen - only members assigned to your server will display in the member list.
- All Members - To display all members on the entire aG Data server, click on the show all members button. You will see the All Members title at the top left of the screen - all online members will display in the member list. Please note that when selecting the show all members option, it will take a minute or two to download the entire list from the aG Data server, since there are so many online members.
- To view the Our Members/All Members screens, continue to the next page.
Assigning a Member to Your Server:
- To assign an existing member from the aG Data server to your server, set the member list to display All Members by selecting the show all members button.
- Select the member from the list you wish to assign to your server.
- Click the assign to server button at the bottom of the member list panel.
- The member is now assigned to your server and will display in the member list when the Our Members option is selected.
Removing a Member from Your Server:
- To remove a member from your server, set the member list to display Our Members by selecting the show our members button.
- Select the member from the list you wish to remove from your server.
- Click the remove from server button at the bottom of the member list panel.
- The member will no longer display in the member list when the Our Members option is selected. Note: The member is not deleted, just removed from the Our Members list.
Member Manager
List members only on your server, or all members on all servers.
Our Members - members on your server All Members - includes all members
- When the Our Members option is selected, choose remove from server at the bottom of the member list to remove the selected member from the list.
- When the All Members option is selected, choose assign to server at the bottom of the member list to add the selected member to your server. That member will then display in the Our Members list.
Analysis
The Analysis screen allows you to view simulator usage statistics. There are two main sections: SIMULATORS and SESSION INFO.
- The SIMULATORS section is populated with all of your simulators and gives a summary of their usage, including the total amount of time played, number of range sessions, and number of round sessions.
- Immediately below the SIMULATORS table, the total time played, total range sessions, and total round sessions display.
- When you select a simulator from the SIMULATORS section, the SESSION INFO table is populated with a list of sessions played on that sim.
- The SESSION INFO section displays information for each simulator session including the time and date that the session was started, the amount of time played for that session, the number of shots taken, holes completed, mulligans taken, removed strokes, the names of the players (online members will be hyphenated with their online user ID), and the course used.
Analysis
- Use the FROM and TO date fields at the top right of the Analysis screen to specify the range of dates to retrieve data.
- By default, the Analysis screen will display one month’s worth of data. Note: Selecting a very large date range could take a minute or so to retrieve the data.
- Near the bottom of the screen, there are 3 button options:
- refresh
- export to excel
- excel 2000 format
- The refresh button will update the Analysis statistics to include any new data that has been entered.
- The export to excel button will initiate the download of a Microsoft Excel-compatible file with the statistics for the date range you selected. By default the file downloaded is compatible with Microsoft Excel 2003 and later.
- If you have an earlier version of excel, select the excel 2000 format option before clicking the export to excel button. Note: When opening the file in Excel, you may get a message like “The file you are trying to open, is in a different format than specified by the file extension. Verify that the file is not corrupted and is from a trusted source before opening the file. Do you want to open the file now?” This message is displayed because the file was not generated by the Microsoft Excel program, but instead by aG Control. Simply click Yes and the file will open with no problems.
Options
- At the Options screen, set default values and other settings including:
- Default Player Settings - Values set in this section display at the Member Manager screen when creating a new member.
- Default Game Settings - Values set in this section display at the Create/Resume Round menu.
- Refresh Interval - The time selected here is the time it will take to refresh or update the aG Control screens, in seconds.
- Service Request Sound - Select to play a sound when a service request is received or to turn the sound option off.
- After setting your default values, click SAVE to save your changes.
- To restore settings to their original values - values set with the original software - click the restore defaults button.
- You also have the option to navigate to the SDK Manager menu from this screen. For further information, see the SDK Manager section.
Options
Default Player Settings
- At the default player settings panel you can specify the default settings to display when choosing the Create Member option at the Member Manager screen.
- Note: You cannot set a default username, password, or email.
- To save and accept your default player settings, choose the SAVE button in the lower right.
- The next time you choose to create a new member at the Member Manager screen, all your default member settings, including both Member Info and Game Settings, will be displayed.
Options
Default Game Settings
- At the default game settings panel you can specify many of the default round options that display when creating a new round at the Create/Resume Round menu.
- If an option is disabled in this panel, it means you are not able to set a default for that option.
- You can also set values for scoring types and handicaps that are not setup as your default by completing the following steps:
- Choose a scoring type option (Stableford / Match) or a handicap option (Absolute / Relative).
- Select the values you wish to associate to that option and click SAVE.
- Now go back and reset the scoring type / handicap option back to your default and click SAVE.
- All values associated to the previous scoring type or handicap option will still exist even though that option is no longer your default value.
- When creating a new round, if you select a scoring type or handicap option that is not your default, you will see the values you have previously saved for those options.
- For example: If you had previously set up Stableford scoring points, and you select the Stableford scoring option for your round (but the default scoring type is Stroke), you will see the default points you had previously setup for the Stableford scoring option.
Options
Control Options
- Refresh Interval - The time set here determines how often the aG Control UI checks for updates from the server, in seconds. The lower the number, the closer you get to real-time updates; however this also means more network traffic and could mean decreased performance, so it is best to find a balance that works for you.
- Service Request Sound - When you have a pending service request from the simulator (a customer has pressed the Call Attendant button or a problem exists requiring attention), you have the option to turn on a service request sound. When this option is on, the aG Control UI will produce a recurring sound to get your attention. Note: You must have speakers attached and turned up in order to hear this sound. Click the speaker icon next to the dropdown menu to test the sound.
SDK Manager
The SDK Manager lets you set various options. To access the SDK Manager:
- Click on the SDK Manager button at the lower-left corner of the aG Control Options screen or type the SDK Manager url in your browser window.
- To enter the SDK Manager url in your browser window type: http://<ip address>/SDKManager, where the <ip address> is replaced with the IP address of your SDK server.
- For Example: If your IP address is 192.168.1.205, then the URL you would type in would be http://192.168.1.205/SDKManager.
- The SDK Manager login page will display.
- Use the same login name and password that you use to access aG Control.
SDK Login Screen
- The SDK settings are not related solely to aG Control - but most settings affect aG Control in some way.
- Many settings have tooltips that will display more information when you hover over the label with your mouse.
- The 3 SDK Manager sections are:
- SDK Settings
- Server Info
- Build Manager
- In the bottom left corner, you may see a button labeled aG Control if you have Control Mode enabled. Clicking this button will take you to the aG Control login page.
- Below the aG Control button, the SDK version that you are currently using will display.
SDK Settings
The SDK settings let you control the behavior of your SDK Server. The available settings are:
- Parent Server Communication - Tells the SDK whether or not to attempt to send data up to its parent server. This should be disabled if the server is permanently offline or unable to communicate with the parent server for some reason - which will increase performance by not attempting to establish a connection.
Setting this value to ON will allow all communication. This is the recommended setting.
- Setting this value to OFF will not allow any communication, so using online members will not be possible.
- The third option, auth only, allows communication needed for the purpose of using online members, but will not allow any extra data, like saved rounds, shot data, Balance data, Flix videos, or lessons to be uploaded to the server for the customer to view on the aG Data website.
- Parent Server URL - This is the URL of the parent server. By default, the parent server is the aG central server, but this can be changed to incorporate a middle-man, if desired.
- Automatic Updates - Configures how automatic updating will work for the SDK. If AUTOMATIC is selected, updates will be downloaded and applied automatically with no user interaction. If NOTIFY is selected, an email will be sent to the SDK administrator at the facility notifying them that an update is available and giving them the instructions to get it. If NONE is selected, the SDK will not check for updates.
- Data Storage - This is used to set the number of months (31 days) that data should be stored. All data older than the specified amount of time will be deleted on a nightly basis. This will help maintain peak performance and ensure that the server doesn't run out of storage space. The data that will be cleaned up includes: session info, Balance data, Flix videos, lessons, saved rounds, scorecards, and shot data.
- Control Mode - Tells the simulators whether or not to send data for aG Control.
- Data Mode - Tells the simulators whether or not to send shot data for all users. If Data Mode is not selected, shot data will still be sent to the server for logged in online members who choose to upload their shot data in the simulator.
SDK Manager
Server Info
The Server Info section lets you set specific information about your server, including the server’s name, the owner username, and the owner email address.
The Build Manager section shows you a list of available SDK versions and lets you switch between them.
Note: If your Automatic Updates setting is set to AUTOMATIC, switching to a different SDK build here will be temporary. Each night, the server will check to see if there is a newer version of the SDK available and it will download and apply it. This is why NOTIFY is the recommended setting.