aGFlix1500SeriesTrainingManual
Page 1 - aG Flix 1500 Series Training Manual
aG Flix
Training Manual
1500 Series - March 2019
Table of Contents
**Click on a topic below to jump to that section
Introduction
Integrated with 3Trak-powered aboutGOLF technology, aG Flix provides world-class video swing analysis.
aG Flix video is time stamped by the system, enabling synchronization at the instant of impact. It can also be integrated with data from aG Balance, allowing side-by-side display and more flexible ways to view and analyze results.
Drawing and analysis software options enable the teacher to dissect the swing, annotate elements of the swing, and compare performance to available pro videos.
To enable aG Flix in the game, your license key must include the aG Flix product.
aG Flix is only available at the Range and is not available during round play.
aG Flix Screen
Start aG Flix
- To access aG Flix:
- From the Main menu select Practice.
- If the 360 Range is installed:
- Choose Range to go to the Practice Range.
- Choose 360 Range to go the 360 Range.
- At the Golfers screen, click Range.
- To view the aG Flix menu:
- Take a shot and then click on the aG Flix tab at the Post Shot menu.
- OR choose Navigate – Post Shot – aG Flix before taking your shot.
- You can also view the aG Flix video in the aG Balance post shot menu.
Choose Practice at the Main Menu
Start aG Flix
If the 360 Range is installed, choose Range or 360 Range
Click Range to start aG Flix Session
Start aG Flix
To capture shot video to view at the aG Flix menu:
- Attach one or more cameras to your simulator.
- Be sure at least one camera is enabled.
- Take your shot and click the aG Flix tab at the top of the screen to view your shot video.
- Note: You also have the option to enable/disable video capture before taking your shot by clicking the camera icon at the upper right of the Range screen.
- When the camera option is on, all enabled cameras will capture video for your shot.
- When the camera option is off, no video will be captured.
Capture Video is ON for aG Flix
Start aG Flix
To view the aG Flix menu before taking a shot:
First choose Navigate – Post Shot.
Lessons
The Lessons option allows you to record your Range sessions for future review. Important Note: You must have the aG Flix product licensed for your build in order to review the lesson you have recorded.
- The first time you attempt to record a lesson you will be prompted to install the FastCodec product.
- Exit the game and go to the Program Files/Friendly Software/World Tours Golf folder.
- Click on the fastcodec-setup.exe file to install FastCodec.
- The Lessons option is available at the Range and will create a video of your shot play including all keystrokes. Note: The Lessons option is only available at the Range and is not enabled for Round play.
Record a Lesson
- At the Range, click LESSONS - start lesson (F9) or hit F9 to start recording your lesson. You may record a lesson for up to a maximum of 5 minutes.
- You will be prompted to select a screen resolution. Note: Selecting higher resolutions will result in larger files that may be problematic if you intend to distribute the lessons by email or upload to aG Data.
- While your lesson is recording, you will see the RECORDING option at the top left of the screen.
- To stop recording your lesson, click Lessons - end lesson (F9) or hit F9 to stop recording.
- You will be prompted to save and name your lesson. Note: The lesson recording will automatically stop after 5 minutes - you will be prompted to save your lesson.
Click Start Lesson or F9 to start recording a lesson
Lessons
Record a Lesson
- Next select a screen resolution to record your lesson in. Note: Higher resolutions will result in larger files that will increase the upload time to the cloud and the download time to the viewing device. We recommend using lower resolutions if the recipient intends to use mobile devices with smaller screens (e.g. iPhone and Android phones).
- Click LESSONS – end lesson (F9) , or Hit F9 to stop recording a lesson.
- Enter a lesson name then click OK to save your lesson.
Lessons
 Lessons Manager
- The Lessons Manager menu displays all your lessons that have been saved.
- To access your lessons, click the LESSONS button at the Range or at any Range Post Shot screen.
- Choose lessons manager.
- After saving your lessons, you will see them listed in the Lessons Manager menu.
The following options are available at the Lessons Manager:
- replay lesson - Click the play icon to the left of the lesson to replay the recorded lesson.
- select all - Select all the lessons in the list.
- unselect all - Unselect all the lessons in the list.
- select today’s - Select only those lessons that were saved today.
- burn CD - Burn the selected lessons to CD/DVD.
- e-mail lessons - E-mail the selected lessons.
- Enter the recipient and sender email addresses.
- The recipient will receive an email with URL access to the recordings in the cloud.
- Lessons can be viewed on a variety of devices including iPhone, iPad, Android and Windows systems.
- If you wish to customize the look of your lesson e-mail, update the LessonEMail.txt file in the C:\Program Files\Friendly Software\World Tours Golf folder before you start the game.
- upload to aG Data - Upload selected lessons to the aG Data website. Note: The selected member must be a logged in online member to upload lessons to the website.
- erase lesson(s) - Erase/Delete selected lessons.
- list by name / list by date - Click this option to toggle between sorting by lesson name or by the date the lesson was created.
aG Flix Toolbar Options
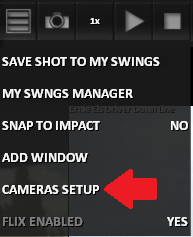
aG Flix Toolbar Menu icon - Click to display the aG Flix menu options including:
|- Save Shot to My Swings - Save all swing videos for the current shot to My Swings Manager.
- My Swings Manager - Manage saved shot swing videos and live recording videos.
- Snap to Impact - Click to turn on/off. When on, all current shots will be repositioned near the point of impact.
- Add Window - A maximum of five windows can be displayed at one time.
- Cameras Setup - Setup your cameras including resolution, frame rate, shutter speed and brightness.
- Flix Enabled - Turn on/off Flix cameras to capture shot videos.
- Live View - Click the camera icon to turn on/off live view mode.
- Playback Speed - Click to choose the speed to play back videos including:
- 1x - Playback in normal speed.
- 1/2x - Playback in half of normal speed.
- 1/4x - Playback in one fourth of normal speed.
- 1/8x - Playback in one eighth of normal speed.
- 1/16x - Playback in one sixteenth of normal speed.
- 2x - Playback twice as fast as normal speed.
- Playback Controls - Play, Pause/Stop, Advance by Frame Reverse, Move slider to desired Frame, Advance by Frame Forward. Note: You may also use the right and left arrow keys to advance/reverse your video frame by frame.
- When not in use, the entire aG Filx toolbar will fade out to increase the visibility of videos displayed.
aG Flix Toolbar Options
My Swings Manager
- The My Swings Manager menu displays all your saved shot and live segment videos.
- To access your saved videos, click the aG Flix tab on the Range Post Shot screen.
- Click the Menu icon on the Toolbar menu and choose My Swings Manager.
Swing Videos
- The My Swings Manager menu contains all shot videos that have been saved by selecting the Save Shot to My Swings option from the aG Flix Toolbar menu.
To upload your shot video to the aG Data website:
- Your member must be an online member and logged in.
- After taking your shot, select Save Shot to My Swings from the aG Flix Toolbar menu.
- Set the Upload option (at top left) to Yes or Auto.
- Choose Continue - your shot video will be uploaded to aG Data.
The My Swings Manager menu also contains live segment videos that have been recorded and saved after choosing the start live recording option.
To create and save a live recording:
- Click to select the camera window to record video for.
- The video menu will display.
- Click on the start live recording option to start recording.
- To stop recording and save your live video, click the square icon on the Flix toolbar.
- Note: Only the camera selected will capture live video.
aG Flix Toolbar Options
My Swings Manager
After saving your shot videos, you will see them listed in the My Swings Manager menu.
My Swings Manager Options
- change club - Click to select a club to display saved shot videos for.
- select all - Select all the shot videos in the list.
- unselect all - Unselect all the shot videos in the list.
- delete - Delete the selected shot videos.
- e-mail shot - E-mail the selected shot videos.
- Enter the recipient and sender email addresses.
- The recipient will receive an email with URL access to the recordings in the cloud.
- Shot videos can be viewed on a variety of devices including iPhone, iPad, Android and Windows systems.
- If you wish to customize the look of your shot video e-mail, update the ShotEMail.txt file in the C:\Program Files\Friendly Software\World Tours Golf folder before you start the game.
- list by name / list by date - Click to choose how your shot videos are sorted - either by shot video name or by the date the shot video was created.
aG Flix Toolbar Options
Add Window
- Click on the aG Flix Toolbar Menu icon and choose Add Window to add a new window to the screen.
- Up to five windows with videos can be displayed and played back at one time.
aG Flix Toolbar Options
Remove Window
- To remove a window from the aG Flix screen, click on the window you wish to remove and choose remove window from the video menu popup list.
aG Flix Toolbar Options
 Cameras Setup
- To disable/enable your cameras and setup your camera options choose Cameras Setup on the menu list.
- The Cameras Setup menu is displayed.
- Note: If the Administrator password is enabled (at the Utilities screen), a password will be required before accessing the Cameras Setup Menu.
aG Flix Toolbar Options
Cameras Setup
The following options are available at the cameras setup screen:
- Name - Select a pre-defined camera name or enter a user-defined name for your cameras.
- Resolution and Frame Rate - Select the resolution and frame rate for each individual camera or choose a Custom setting. Choosing color over monochrome and higher resolution (640x480) will increase the percent usage of available capacity.
- Enabled - Click the camera icon to disable or enable the camera, or to identify the camera to be active for Left Handed (LH) or Right Handed (RH) golfers. Options Are:
- Green - The camera is enabled. This is the default setting.
- Red - The camera is disabled.
- RH Only - The camera is only enabled for Right Handed players.
- LH Only - The camera is only enabled for Left Handed players.
- Note: You also have the option to enable/disable video capture before taking your shot.
- Click on the camera icon at the upper right of the Range screen to enable/disable video capture.
- When the camera option is on, all enabled cameras will capture video for your shot.
- When the camera option is off, no video will be captured.
- Bus Topology - Displays the camera topology connection. A horizontal line connecting the cameras indicates they are sharing a common bus. Bus capacity allocated for each individual camera will be reduced, potentially requiring a reduction in resolution or frame rate.
- Bus Capacity - Displays the percentage used based on the cameras enabled and the resolution/fps rates selected.
aG Flix Toolbar Options
Cameras Setup
- Camera Settings - You have the option to change any of the default Camera Settings including:
- Shutter - 2.000 ms. *Note: For most customers, we recommend starting at a Shutter speed of 2.0.
- The duration in which the shutter is open and exposed to the scene (milliseconds). Increasing the shutter speed will brighten the appearance of the image as light is exposed to the camera sensor for a longer period of time. However, increased shutter speeds will increase the amount of motion blur for high speed objects such as the club head and ball.
- Gamma - 2.000. *Note: For most customers, we recommend starting with Gamma set to 2.0.
- A non-linear operation used to code and decode brightness values in still and moving imagery. Applying a higher value to Gamma will have the effect of brightening the pixels (an image) in the outer regions of the spectrum. This is helpful for capturing high speed video in relatively low lighting conditions, such as an indoor Golf Simulator. Unfortunately, increasing gamma will have the side effect of increasing noise in the scene, which will typically appear as an increased graininess of the image.
- Gain - AUTO. *Note: For most customers we recommend setting the Gain to AUTO.
- The Gain increases the pixel intensities converted to video. This setting is particularly helpful with low light conditions, although it has the effect of increasing the read noise levels. Thus, using the minimal amount of gain that will still allow the sensor to saturate will help maximize the camera’s dynamic range.
- Exposure - AUTO. *Note: For most customers we recommend setting the Exposure to AUTO.
- The Exposure setting applies internal algorithms for processing the images.
- Brightness - 6.000%. *Note: For most customers, we recommend starting with a Brightness level of 6%.
- The Brightness setting effectively sets the minimum value for black level that any pixel will return. This will increase the overall brightness of the recorded video without adjusting the contrast. Setting the Brightness too high can have the effect of washing out the resulting image.
- Camera Info - The following information is displayed:
- ID - Displays the camera ID unique to each camera.
- Model - Displays the camera model name.
- RESET - To reset your camera setup options to their original settings, choose RESET.
Pop-Up Menu Options
Click anywhere in the video playback window to access the pop-up menu options for that window.
Options available are:
- video menu… - Click this button to display the following options:
- current shot - Displays the most recent shot video in the selected playback window.
- last shot - Displays the previous shot video in the selected playback window.
- balance - Displays the aG Balance data in the selected window (if applicable).
- pro archive… - Displays a menu of pro golfer videos in the selected window.
- my swings… - Displays a menu of saved shot videos in the selected window.
- no video - Removes the video from the selected playback window.
- size - Click to resize the selected window. Options are:
- large - Choose to display the selected smaller window as large if one window is set to max size.
- default - Choose to re-display the selected window in its default size.
- max - Choose to display the selected window in its maximum size.
- right - Choose to display the selected window in the right screen (for aG Curve mode only).
- left - Choose to display the selected window in the left screen (for aG Curve mode only).
- flip - Click to turn on and flip the currently displayed video.
- playback - Click to turn ON/OFF video playback for the selected video. Options are:
- yes / no - Choose to turn on playback for the selected video window.
- only this window - Choose to turn on playback for only the selected video window.
- all windows - Choose to turn on playback for all windows.
- start live recording - Click to start a live recording. Note: This option is only available if the current shot video is loaded in the selected window.
- remove window - Click to remove the selected window. The last window cannot be removed.
- drawing tools - Click to draw or erase lines, angles, objects, grids and text on video windows.
Pop-Up Menu Options
Video Menu - My Swings
From the video menu list, select my swings to display a menu with previously saved shots.
Select a swing video from the list of saved shot videos.
Compare My Swings to Pro Videos
- You can select previous swing videos (from the my swings list) OR pro videos (from the pro archive list) to compare to your current or last shot video.
- With your current or last shot in one window, load the desired my swings or pro archive video in another window.
- Next, synchronize the videos in both windows so the swings will start at the same location. This will help you to analyze your shot video frame-by-frame.
- Playback both videos in synchronization with each other for comparison.
- Use the playback controls and graphic / drawing tools to analyze your shot video.
To Synchronize Videos:
- Click on the window with the my swings or pro archive video displayed.
- Click to bring up the aG Flix pop-up menu and select playback - only this window.
Compare My Swings to Pro Videos
To Synchronize Videos:
- Move the playback slider bar to the desired location. It is easiest to synchronize the videos at the top-most point of the back swing.
Compare My Swings to Pro Videos
To Synchronize Videos:
- Select the window with the current or last shot displayed. Right click to bring up the aG Flix pop-up menu and choose playback – only this window.
- Move the playback slider bar to the desired location, matching the same location as the window with the my shots/pro archive video displayed.
Compare My Swings to Pro Videos
To Synchronize Videos
- Select in either playback window, right click to bring up the aG Flix pop-up menu.
- Choose playback - all windows.
- When clicking the play button on the playback toolbar, both videos will play in synchronization with each other for comparison.
- Use the playback controls and graphic / drawing tools to analyze video.
Drawing Tools
- There are a number of drawing tools available to assist in swing analysis.
- Click on the video window to bring up the aG Flix pop-up menu.
- Select the drawing tools button.
- Select the desired draw tool, and then click on the video window to start drawing.
Drawing Tools
How to Use the Drawing Tools
- Use the graphics options on the drawing tool menu to apply various training visual aids, measurements, text, etc. to your video.
- Click on the desired graphic option or drawing tool, then use the mouse cursor to apply to the video playback window.
- Erase a single graphic using the eraser icon after selecting the graphic to remove.
Erase all graphics by clicking on the trash can icon.
- Relocate a graphic by selecting the move graphic icon.
- The drawing tool menu will remain up and available for use on the aG Flix screen until you choose to close the menu.
Drawing Tools
Drawing Tool Options
SELECT COLOR
- SELECT LINE WEIGHT
- ERASE ALL GRAPHICS
- UNDO LAST GRAPHIC
- ERASE SINGLE GRAPHIC
- DRAW SQUARE
- DRAW CIRCLE
- DRAW ANGLE
- DRAW HORIZONTAL ANGLE
- DRAW VERTICAL ANGLE
- DRAW LINE
- MOVE GRAPHIC
- DRAW FREEHAND
- GRID ENTIRE WINDOW
- SHADE VIDEO
- INSERT TEXT
- CIRCULAR MEASURE TOOL
- CLOSE DRAWING TOOL MENU
Drawing Tools
Drawing Tool Options
The following is a description of each of the drawing tool options:
- color - Click to choose a different color to draw with.
- line weight - Click to choose the line weight you would like to use to draw with.
- waste basket - Click to erase all graphics on all video windows displayed.
- undo - Click to undo and remove the last item drawn.
- eraser - Click to erase a single graphic. Click the eraser tool icon then click on the graphic to erase it.
- square - Click to draw a square or rectangle over a video image. Mouse click on the desired window to begin the drawing. Drag the mouse to create the shape you would like. Release the mouse to end the drawing.
- circle - Click to draw a circle over a video image. Mouse click to begin the drawing. Drag the mouse to create the size circle you would like. Release the mouse to end the drawing.
- angle - Click to draw an angle. Mouse click on the image you want to draw an angle on. Click the mouse to start the angle and drag the mouse to draw the first line. Release the mouse at the angle's point, then move the mouse and click the location where you would like the angle to end.
- horizontal angle - Click to draw a horizontal angle. Mouse click on the desired window to begin the drawing. Drag the mouse to create the horizontal angle. Release the mouse to end the drawing.
- vertical angle - Click to draw a vertical angle. Mouse click on the desired window to begin the drawing. Drag the mouse to create the vertical angle. Release the mouse to end the drawing.
- line - Click to draw a line. Mouse click on the video image you want to draw the line on then click and drag the mouse to draw the line. Release the mouse to finish the line.
- move graphic - Click to move a specific graphic. Click on the graphic you wish to move and drag it to the desired location.
- freehand - Click to draw freehand over a video image.
- grid - Click to draw a grid over a video image. Mouse click to begin the grid. Drag the mouse to create the grid size you would like. Release the mouse to end the grid drawing.
- highlight/shading - Click to highlight/shade an area over a video image. Mouse click to begin the shading. Drag the mouse to create the shaded area you would like. Release the mouse to end the shading.
- text - Click the ABC icon to bring up the in game keypad and add text to a video image.
- circular measure tool - This tool measures arm rotation to help calibrate wedges for shorter distances requiring a partial swing. For example: Your 40 yard chip might require a 30 degrees back swing. We recommend placing the tool centered on the lead shoulder. Select the shoulder with the mouse and drag for the desired diameter. Release the mouse to end the drawing.
- close menu - Click to close the drawing tools menu.
Running Two High Definition Cameras Concurrently
The following configuration is recommended for running two High Definition Flix cameras.
Grasshopper3 model:
- Resolution : 1152x864
- Frame Rate : 120 fps
- Format: Color (8bpp)
- Max mbps set to 250
These settings can be controlled under custom resolution on the Camera Setup menu. Select custom resolution and adjust the settings on the following panel:
Important Tips
- To upload a lesson or swing video to your online locker at the aG Data website, your member must be an aG Data (online) member and must be logged in.
- The world next to the member name indicates your member is logged in.
Important Tips
To capture a video recording of your shot, you must have one or more cameras attached to your simulator and the cameras must be enabled.
First, enable your cameras at the Cameras Setup screen. if enabled, the cameras will be set to green.
Second, set the Flix Enabled option to yes.
Finally, be sure the camera option is ON before taking your shot.
Note: If the camera option is OFF, a camera with a line through it will display..